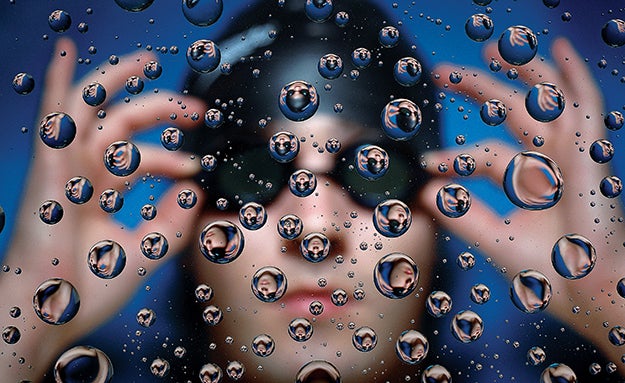
You Can Do It: Shoot a Portrait Through Water Droplets
Water is a great tool to add interest to your portraits

Like most committed shooters, Dustin Snipes, a sports and portrait pro based in Los Angeles, dreams of photography 24/7. As a result, he’s accumulated a warehouse of photo project ideas in his head, many of which might never see the light of day. Luckily, this one did. “I had the idea about a year before I actually scheduled the shoot,” remembers Snipes. “My problem was that I didn’t have the right model. Then one day my friend Steven Barry mentioned that he wanted to swim the English Channel.” The remark brought this project “out of storage.”
If you’d like to try something similar, you don’t need a marathon swimmer—or even a human model. Any subject, even a single flower, will suffice. Once you’ve settled on what to photograph, gather the gear, just as Snipes did: Get a pane of transparent Plexiglas (and the means to suspend it over your subject), a spray bottle, ladder, water repellant for glass (such as Rain-X) and, if you’re shooting indoors, something with which to light your subject. You may also need a ladder to position yourself high enough above your subject.
“Almost any camera and macro lens will do,” Snipes says. But it helps to choose the best focal length for your subject: Portraits need a 50mm or 60mm macro, while small objects do better with a longer macro lens (up to 200mm, depending on subject size). Your photo will also be more engaging if you add color to your background as Snipes did with the blue seamless here.

Step 1 Find your subject. Snipes worked with a distance-swimmer as his model, playing to the thematic concept of the water droplets. Whether you go with a person or an object, it should be small enough to be contained within the beaded water droplets. For added color interest, pick a background hue that contrasts with your subject’s coloring.
Step 2 Build your set. Roll out the background paper, then determine what you will use to suspend the Plexiglas. Snipes used cardboard boxes and paint cans to achieve the right height. Place the ladder so that you can shoot down onto your subject. And finally, set your lights so they don’t reflect off the Plexiglas surface.
Step 3 Prepare the Plexiglas. Snipes applied a coat of Rain-X, a water repellent sold in hardware and auto supply stores, to the Plexi to make the water from his spray bottle bead up. Put the coated pane into position, and, using a bubble level, make sure it’s parallel to the floor—otherwise the beaded water will run off. Finally, spray on the water.
Step 4 Make a few test shots. In a process of trial and error, it can take a few attempts to find the right distance between the subject, Plexiglas, and camera. Your subject should be out of focus enough to avoid competing with its sharp reflections in the water droplets, but not so soft as to be unrecognizable. Set a relatively small aperture. Once you’ve nailed these variables, you’re ready to shoot.
Final Step Apply fixes in postproduction. “I added a basic color correction and flipped the image because I’d shot with the top of the subject’s head aimed toward the bottom of my frame,” says Snipes. “This let me set the ladder above his head and not straddling his body.”
