SHARE
step1.jpg
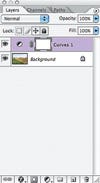
1. Make Your First Adjustment Layer. Find your Layers palette and click on the New Adjustment Layer button to select your first adjustment. We’ll use Curves for all of these fixes. Elements users: you won’t be able to pick Curves, but try Levels to make your changes. Debbie Grossman
step2.jpg
2. The Sky Comes First. The sky comes first. Sample a point on the sky by clicking on it while holding down Ctrl (Command on a Mac) on your keyboard. Then hit the down arrow key to darken the sky until you like the result. Don’t worry about the rest of the image going dark. Click OK. Debbie Grossman
step3.jpg
3. When you create an Adjustment Layer, Photoshop automatically adds a mask (circled). This is great, because it saves you having to create one yourself. Paint on the mask to make sure only what you like is showing. Debbie Grossman
step4.jpg
4. Since you’re masking a smallish area, it’ll be much easier to cover up the whole Curves Adjustment Layer and then bring back what you like. To hide all the changes, type D to make sure the default colors are selected (that’s white as the foreground color, black as the background). Then hit Ctrl + Backspace (Command + Delete on a Mac) to fill the mask with black (circled). Debbie Grossman
step5.jpg
5. Get your paintbrush ready. Hit B to choose it. Slide the Hardness all the way down to zero. A really soft brush is key to saving time and letting you get pretty sloppy with your selections. Since it produces a feathered edge, you won’t have to be super precise, as you would with a Lasso or the Pen tool. A big size (600 pixels in this case) will reveal the fixed sky more quickly. Debbie Grossman
step6.jpg
6. Since the mask is filled in with black, painting with white (circled) will reveal what’s on the Adjustment Layer. Think of the mask as a window—the black is dirt and white is cleaning fluid, letting you see through it. Make sure your mask is selected (you can tell by the little black bars surrounding it), and paint with white onto the sky. Debbie Grossman
step7.jpg
Debbie Grossman
step8.jpg
Debbie Grossman
step9.jpg
Debbie Grossman
step10part2.jpg
10. One more problem: The bright green grass in the foreground draws the eye out of the picture. To tone it down, make a final Curves Adjustment Layer. Grab the top end of the curve and pull it down. Click OK, fill with black, get a big brush, and reveal the grass. Debbie Grossman