Photo Editing photo
SHARE
httpswww.popphoto.comsitespopphoto.comfilesimages2015081_5.jpg
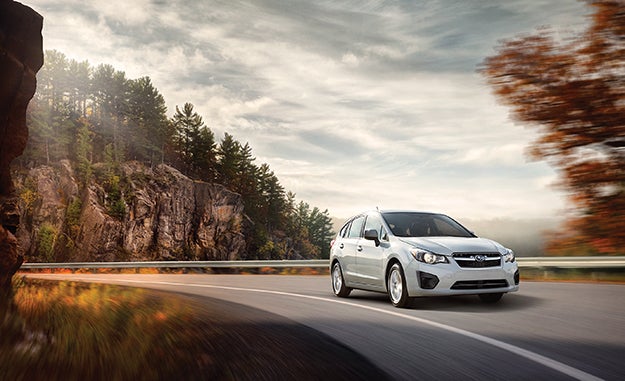
Toronto-based Steve Moretti’s love of automotive photography is evident in his pictures. And to create images of cars on location, this pro often works closely with retoucher Thomas Dziedzic of Ditomasi Productions. For this composite, Moretti captured the background scene at sunrise, shooting multiple sets of about seven bracketed images 2/3 or 1 stop apart. The car in this image was shot in a separate location with less traffic but similar lighting conditions so it would match the background. Moretti used the same lens, height, and angle as he did for the background. Before wrapping the shoot, Moretti cut out the car in Adobe Photoshop and pasted it onto a background image, or plate, to ensure it matched. Then he sent all the images to Ditomasi Productions to work its magic. Given the complexity and detail of this composite, we streamlined this tutorial to show you the basic process.
httpswww.popphoto.comsitespopphoto.comfilesimages2015089_1.jpg
Open the background plates (bracketed images) or place all the plates in a single folder. In Photoshop, go to File > Automate > Merge to HDR Pro (or use a plug-in—Ditomasi Productions used Photomatix). Select the files you want to merge and click OK. In the Merge to HDR Pro dialogue, remove any ghosting and adjust other parameters as needed.
httpswww.popphoto.comsitespopphoto.comfilesimages2015088_1.jpg
Create a clean canvas to draw the eye to the main subject by removing visual distractions, such as the wire overhead. The yellow mid-line was also eliminated to visually broaden the road. Choose the Spot Healing Brush tool [J], and use a hard-edged brush about the same diameter as the object you want to remove. Select Content-Aware Fill in the options bar. For continuous elements, such as the wire in this image, click on one end, hold down the Shift key, then click on the other end (shown circled in progress). Use the Spot Healing Brush to selectively paint out other elements as necessary.
httpswww.popphoto.comsitespopphoto.comfilesimages2015087_1.jpg
Ditomasi expanded the background horizontally to balance the composition and give the car more room to visually move forward in the scene; otherwise, the car would essentially have nowhere to go except off the edge of the canvas. To expand the background, duplicate the background layer. Select the new layer. Go to Edit > Transform and grab the center handles (circled) at the horizontal edges of the canvas (the white area; not the image itself). Drag the edges of the canvas to the desired width and. Click the checkmark to apply the adjustment.
httpswww.popphoto.comsitespopphoto.comfilesimages2015086_1.jpg
To balance the color temperature of the merged background plates so it appears that they were all shot at the same time of day, apply adjustments as needed. The retoucher used multiple layer adjustments to tweak the sky and rock formation at left. First, select the sky (the Quick Selection tool worked well). Go to Layer > New Adjustment Layer and choose Levels, Curves, or Hue/Saturation. Select and add new adjustment layers as needed.
httpswww.popphoto.comsitespopphoto.comfilesimages2015085_1.jpg
To create the illusion that you were shooting from a lead car, add motion blur. In this image, blur was added to the tree, part of the road, the railing, and the foliage in the lower left. First, duplicate your background layer. Then use the Lasso tool to select an area to blur. Go to Filter > Blur > Motion Blur. Adjust the Angle to simulate motion direction (90 degrees is vertical). Start with a 0 degree angle for a right-to-left motion. Adjust Distance to increase or decrease the amount of blur. Repeat as necessary throughout the image.
httpswww.popphoto.comsitespopphoto.comfilesimages2015082_2.jpg
As in step one, merge the bracketed shots of the car. Use the Pen tool to cut it out (and its shadow, if possible) and paste it onto the road. Go to Edit > Transform, then grab a corner handle and hold Shift to adjust size and angle without altering proportion. If necessary, use Perspective Warp (Edit > Perspective Warp) to adjust the car’s placement to fit the overall perspective. If you have a photo of a spinning tire (see Quick Tip), cut and paste it into place; Ditomasi Productions used spinning tires on both front and rear tires.