Adobe Lightroom Mobile for iPad: Hands-On Preview
Sync your catalogs and edit photos on the go

We may earn revenue from the products available on this page and participate in affiliate programs. Learn more ›
We’ve been hearing rumors – and seeing demos – of Lightroom‘s mobile version for a while now, and we are very happy that its first iteration has been released. WIth it, you can sync your photos between your desktop computer and iPad, make edits offline, and share via social media. There’s also an online gallery that will let you display those same collections (but not edit them) from any computer connected to the Internet.
This is definitely an early release. At press time, it’s iPad-only, which means iPhone and Android users are out of luck. And features like star ratings have not yet been integrated (you can flag your favorites though). Still, setting it up is simple and seamless, and in its first version it is already incredibly useful.
How much does it cost? If you’re signed up for the Creative Cloud, unlimited synching is included, whether you’re a member of the Photoshop Photography Program or have one of the other three pricier complete plans. (Note that the Photography Program, which at press time costs $9.99/month and includes only Photoshop and Lightroom, is set to expire on May 31, 2014. But it’s been extended before, and we’re hoping Adobe will extend it again.) Have a normal Lightroom license? You’ll have to sign up for CC if you want the use of Lightroom mobile. For photographers with iPads, we think it is completely worth it.
Here are the basics to get started using Lightroom mobile, and a tour of its best features. -Debbie Grossman
Step 1

Set it up. This is just as easy as you’d hope it would be. Make sure to download the latest version of Lightroom 5 for your computer, and download the Lightroom mobile app from Apple’s app store. On your computer’s LR, click on the identity plate in the top left corner to sign in. Then enter your Creative Cloud account credentials. Open the app on your ipad and do the same thing.
Step 2

Now sync your photos. Lightroom mobile syncs by collection, so you’ve got to create a new collection for every group of images you want to see on your iPad, or choose to sync collections that you’ve already made. If all of your stuff is organized into folders, note that creating a collection from a whole folder is easy and fast—all you need to do is drag the folder down to the Collections panel to create one that contains everything the folder does. Next to the collection on the far left, you’ll now see a little checkbox. Click it to sync. You’ll see a small sync symbol appear to indicate that the folder is available in LR mobile. Then open the app to see your collections appear.
Step 3

The nice thing about syncing is that it goes two ways. You can see photos you add on your computer on your iPad, and iPad photos on your computer. To pull photos from your camera roll into a collection, tap the plus arrow in the top-right corner of the main iPad screen, and tap OK. Then tap the ellipses at the bottom of the new collection’s thumbnail to see more options, and tap Enable Auto Import. You can also manually add images from your camera roll. Auto camera roll upload will likely be far more useful when there’s an iPhone app (or when the iPad’s camera gets better!). For now, if you have Photo Stream set up, you can send iPhone images from there to your camera roll and then get them into Lightroom mobile.
Step 4

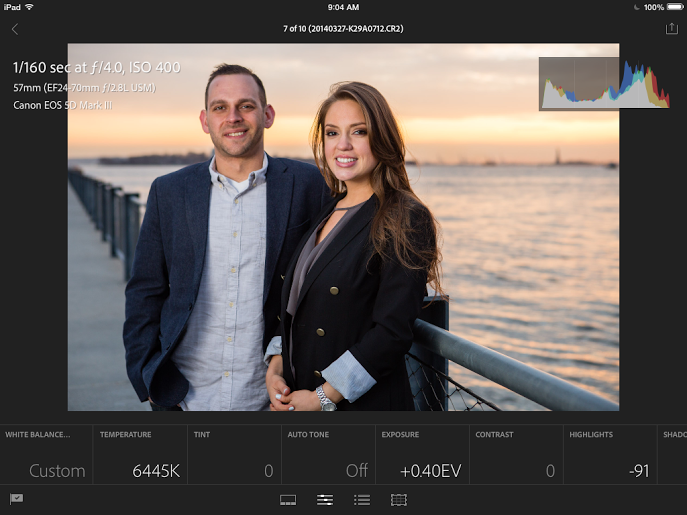
Adobe tells us that star ratings are imminent (they plan to update the app as frequently as possible with new features), but until then, you can sort and choose your favorites by flagging. View your image full screen, or choose filmstrip view from the menu at the bottom. Then swipe up or down on your image to flag it as a pick or a reject, or to unflag it altogether. Tap the metadata in the top left to see various image attributes. When you’re done, it the arrow in the top left to go back to the main menu.
Step 5

The ability to edit on the go may be the best part about Lightroom mobile (though of course you’ll want to check color when you’re back at a color managed workspace). To see your picked images, tap the down arrow under the folder name in the top center of the screen. Then choose the photo you want to address, and tap the adjustments icon. There’s a gray “dropper” under WHite Balance, or you can use the usual temperature and tint sliders. All of the adjustments of the Basic panel are accessible, including Clarity and Vibrance. You can also get to all of Lightroom’s built-in processing presets. (Still missing: the ability to use your own favorite presets or do processing-heavy tasks like retouching or distortion fixes.)
Step 6

The ability to share makes the app most useful, particularly for photographers who prefer to give the royal treatment to even their Instagrams. When you get something you like, tap the share button in the top right corner. For now, you can only go to services native to the iOS, such as Facebook. To share to Instagram, first save to your camera roll. You can also, of course, send a (non-full-res) image by email or, if it’s set up, by iMessage.
Get the rest of the details on the official Adobe page