You Can Do It: Shoot Action Photos With Beautiful Backgrounds
Photographer Scott Markewitz on framing action photos

Images of skiing, mountain biking, and other active outdoor pursuits need more than sharply frozen athletes and eye-grabbing kinetic energy. Action shots need great backgrounds, too. “I always pay attention to what’s happening behind my subjects,” says outdoor specialist Scott Markewitz of Salt Lake City. “I use backgrounds to make the subject stand out, or to unify or pull together the overall composition. I like clean, fairly uniform locations, and I avoid scenes that are busy or cluttered.”
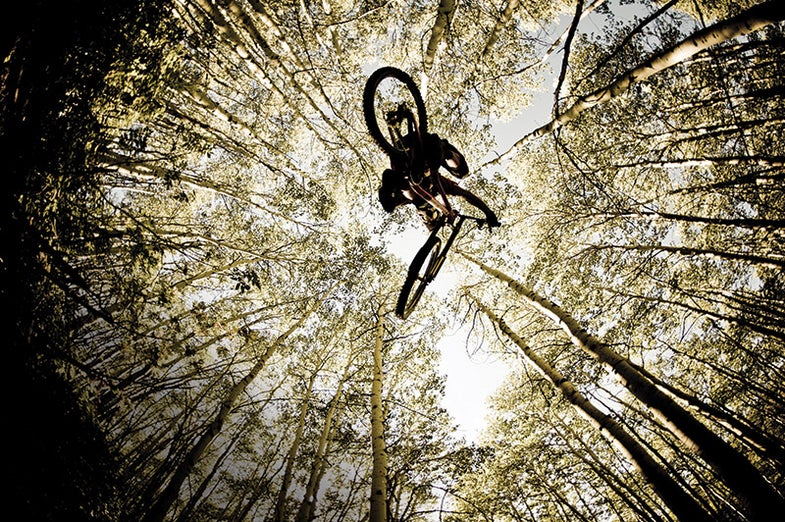
For this image of pro rider Eric Porter, Markewitz was drawn to a grove of aspens. “The nice thing about aspens is they have a clean, linear look, especially when you shoot straight up at them. Bushier trees like some firs or maples hide their trunks behind layers of foliage and wouldn’t work for a shot like this. Aspens point straight up like arrows,” says the photographer. If you position yourself with a little care and have the right lens, those “arrows” can point straight to your subject.
To take a photo like this, Markewitz suggests that you:
•Pick the right tricks. When the rider performs complicated tricks with flips or spins, it can look great in video but confusing in stills. “Keep the tricks simple, with poses the rider can hold for a second,” says Markewitz.
•Shoot in continuous mode. You need to be able to pop off between 5 and 10 frames per second in order to capture a perfect moment.
• Start with practice runs. Have your subject go through a set of trial runs so you will know where to position yourself.
• Use manual focus. Prefocus in manual at a point where you know the athlete will soon be.
Step 1
Line up a subject. “You can’t ask just anyone to get on a bike, fly off a ramp, strike a pose, and land safely,” says Markewitz. “Only experienced riders need apply.”
Step 2
Find a location. Look for dense, evenly wooded stands of aspens, red pines, or other tall trees with bare trunks and thinly foliated canopies.
Step 3
Get the right gear. Markewitz opted for a fisheye lens for the depth and drama it created. Athough the biker appears to fly high, he was only five feet above the photographer, who laid flat on the ground and shot up on his subject. The fisheye’s 180-degree angle of view also captured the entire length of the tree trunks, creating strong converging lines that all lead to the subject. Your camera should offer a fast burst speed, to at least 5 fps.
Step 4
Wait for the right light. Overcast skies will produce more even lighting with highlight and shadow levels relatively close. If you must shoot under direct sunlight, go when the sun is low on the horizon as Markewitz did here. This shot might also work with sun immediately behind the subject. Final Step Compose with care and fire away. “For this shot, centering the subject was important for the overall composition, but I also needed him close to the center because I was shooting with that fisheye lens,” said Markewitz. “With fisheyes, the image center shows much less distortion than its edges.”
To immerse yourself in Scott Markewitz’s killer action photos, go to scottmarkewitz.com. Markewitz will teach a Pop Photo workshop, sponsored by Sony, in Palm Springs, CA, this month. Visit imaging-edge.com/workshops.