Tips from a Pro: A New Perspective on Nature Photography
Get more intimate with your subjects

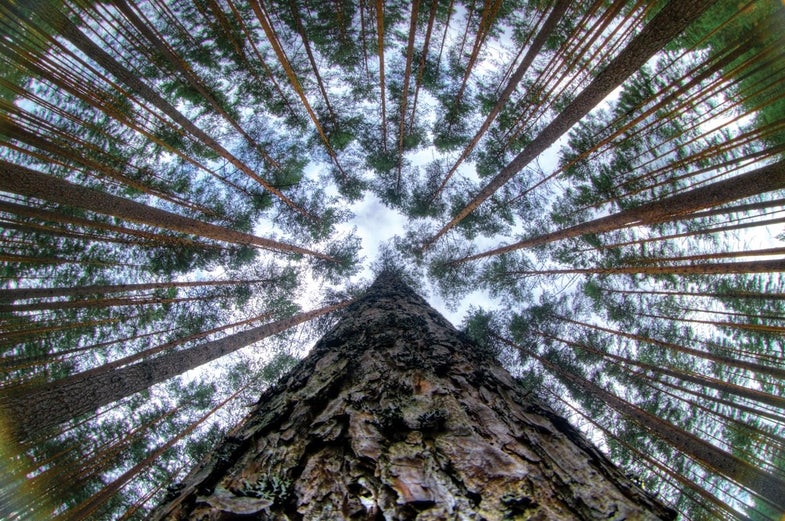
We always say it helps to get close to your subject, and Erik van Hannen of the Netherlands did just that while vacationing in Råda, Sweden. To take the shot shown here, he firmly braced his Pentax K20D against the trunk by throwing his arms around and hugging his subject. You can’t get much closer than that. “I don’t recommend doing this when there’s anyone around who can see you,” van Hannen advises.
For a picture as good as this one, though, we feel it would have been worth the embarrassment. Though we’ve seen plenty of fisheye photos looking up at a stand of trees, rarely do you come upon this level of detail, color, structured line, and dizzying prospective all in the same image.
How did van Hannen capture such qualities? For strong line, he sought out a stand of evenly distributed pines, with tall, straight trunks and minimal branching that leafed out only at the top of the canopy. For color and detail, he used high-dynamic-range (HDR) by making separate exposures for the shadows, midtones, and highlights, then blended the three exposures later in software. Without it, this high-contrast scene would have lost detail, texture, and color in the highlights, shadows or both.
So the next time you explore the forest for photos, give van Hannen’s technique a try—even the tree hugging. Here’s the steps he took to get the shot:
Step 1
Gather your gear. It is important to have a camera with autobracketing and an ultra-wide or fisheye lens.
Step 2
Find the right forest. “You’re looking for lots of tall, straight trees that branch out only at their tops,” says van Hannen. “When you’ve found the right forest, locate the tree with the biggest trunk.” Look for a wide-diameter, textured trunk that can anchor your composition. Take a series of test shots, moving around the tree, to find the forest’s “best side.”
Step 3
Wait for a calm day. For easy HDR compositing, you want a subject that remains stationary between exposures. Even a little wind can sway limbs or foliage, making a blurry mess of your composited image. His HDR software of choice: Photomatix.
Step 4
Use the tree as a support. When shooting, set a small aperture for enough depth of field to render the tree trunk sharp from foreground to middle ground, and brace your camera against the tree. Van Hannen actually hugs the tree to press the camera tightly against the trunk, staying careful not to include himself in the shot.
Final Step
Crop for straight lines and symmetry. Van Hannen shot with a fisheye lens, and to remove the linear distortion that occurred along the frame edges, he cropped into the shot on all sides.