How To: Fix Lens Distortion
Lens correction made easy with Photoshop
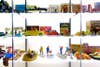
Note we exaggerated the distortion in Xin Wang’s original image for Step 1 so that you could see the effect more clearly. Open your image in Photoshop, and go to Filter > Lens Correction. On the right side of the screen, you’ll see two tabs: Auto Correction and Custom. Start with Auto, which is automatically selected. In the image for this step, no correction has been applied yet, and the picture has all kinds of distortion. The shelves appear bowed out and crooked, and it appears that the camera was not facing them head on. Xin Wang

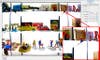
This photo was shot with a Nikon D700 and the Nikon 14-24mm f/2.8G ED AF-S lens. Sometimes the Auto Correction tool will find the correct profile automatically based on your picture’s metadata, but if it doesn’t, use the pulldown menus under Search Criteria to locate the right profile. Clicking on it will improve your image. Notice how the vertical metal poles and the horizontal shelves appear much straighter. The default settings leave the boxes for Chromatic Aberration and Vignette unchecked, but try clicking them to see whether they make your shot look better. In this case, the vignetting removal was much too strong. Xin Wang
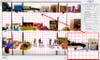
While the auto correction fixed the distortion caused by the lens, it couldn’t fix the distortion caused by the photographer. To work on that, head to the Custom tab. Start by turning on the Grid, which will help you figure out what’s straight and what isn’t. To see it, check the box for Show Grid that appears along the bottom of the screen. Modify the size to one that helps you judge your image, and change the color to something fairly visible. On this very white picture, red works well. Now hit A on your keyboard to get the Straighten tool. Find what should be a straight, horizontal line on your picture, and click and drag it along that line to right your crooked image. Use the grid as a guide. Xin Wang
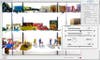
Now one horizontal line is straight, but this picture still has issues. Because the camera was angled slightly downward, the vertical lines appear to narrow toward the bottom of the image (in the previous step, they don’t line up with the grid). Fix this with Transform sliders. Grab the one to adjust Vertical Perspective, moving it right until vertical lines are more closely aligned with the grid. For the horizontal lines, which narrow on the right side of the picture, slide the Horizontal Perspective slider slightly right. You should only need to move these sliders in tiny increments to fix your image. Then turn off the grid to check your work ___ to get free software for making and downloading lens profiles._ Xin Wang