How To: Covert Images to Black and White
You don't need a plug-in to get great results.

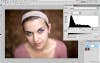
A great monochrome usually needs great tonal range, so begin by making sure your color image contains true black and true white, even before you take the colors out. To do so, create a Levels Adjustment Layer. Drag the white triangle inward until it abuts the beginning of the histogram, and do the same thing with the black triangle. If you need to, drag the center triangle left or right to brighten or darken the midtones. Luisa Mohle
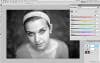
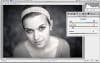
While Photoshop’s built-in black-and-white tool isn’t as versatile or as feature-laden as a plug-in, it’s the best and easiest place to start when you’re doing a b&w conversion. Use the tool in its Adjustment Layer form—to open it, just click on the button for Black & White in the Adjustments Panel. Click the Auto button to try out a potential starting point. Then grab the hand-shaped tool, and place the hand on your image. Drag right on any tone to lighten it, left to darken it. Luisa Mohle
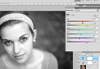
Next, try filters and presets. Use the pull-down menu in the Black & White tool to experiment with wildly different looks for your image. If you go for the High Contrast Blue Filter, you’ll get a very gritty, dirty effect. A sure way to bring out any imperfections if you have a portrait subject, this may be best left to still lifes and urban scenes (unless, of course, you really don’t want to flatter your subject). Try a Red Filter for soft skin tones, but if the effect is too much, move the Reds slider left to mellow it out. Luisa Mohle
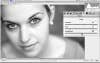
Want to add a film-like grain? Adobe Camera Raw has a much more sophisticated method for adding grain than Photoshop does. So save your image as a flattened TIFF and head to Bridge. Then go to File > Open in Camera Raw. Choose the Effects tab, and zoom in on your image to 50%. Once you increase the grain by moving the Amount slider to the right, the automatic Size and Roughness will kick in. The defaults are good for adding subtle texture, but you can increase all three sliders to make your image look really grainy. Luisa Mohle
Another thing ACR has over Photoshop is its tool for Split Toning, which can add a slightly different tint to your highlights than your shadows, and can add a feeling of extra depth to a black-and-white photo. Click on the Split Toning tab to get started. A classic split tone creates warmer highlights and cooler shadows. To try it, select a warm, yellow-orange hue for the Highlights and a cool blue for the shadows. Then slowly increase the Saturation for each. Shift the Balance slider left to see more of your cool Shadows tone, or to the right to see more of your warm tone. Luisa Mohle