From Shutter Press to Finished Image: Romain Laurent
Three top professionals share their best tips and tricks for retouching

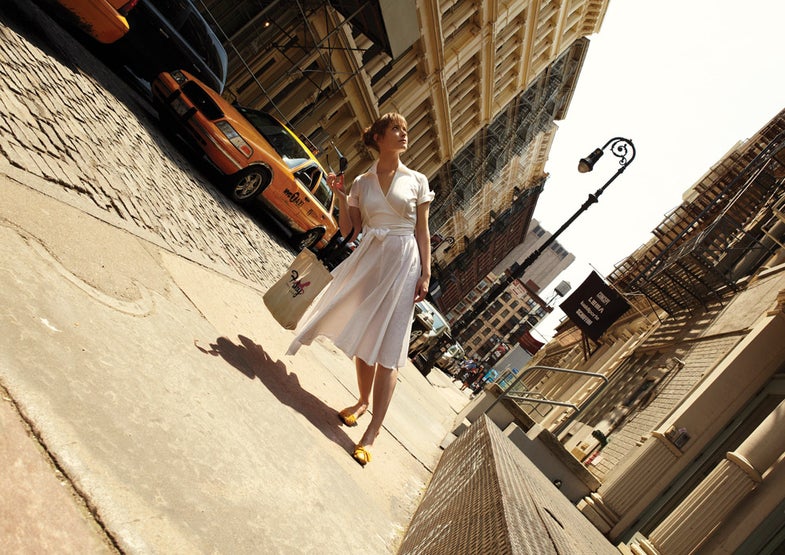
One morning, Romain Laurent woke up with vertigo. Instead of calling the doctor, he thought, Hey, this is fun! And in that moment the idea for his “Tilt” series came to him. He saw the image in his mind’s eye almost exactly as it appears in his actual photographs.
Mostly a commercial shooter, Laurent periodically dedicates time and resources to personal projects. Basing this one on a skewed perspective, he needed a city with lots of straight lines to make it work. Paris’ lines didn’t emphasize the tilt enough, so he headed to New York City for its narrow streets and tall walls of buildings as much as for its indifferent passersby.
Laurent sketched his concept, then planned his shooting technique, scouted locations, and cast models. For commercial jobs, he usually employs lots of assistants, lights, and people for hair, makeup, and wardrobe. But for this shoot he wanted more realism, so the models wore their own clothes and were lit only by daylight.
Each image from the series was made from at least two shots: the background and a leaning model supported by an assistant. But because Laurent is a perfectionist—and because he could—he patched in other elements from the shoot that would make the final image even better. The picture here uses a perkier bow from another photo of the dress, a different view of the model’s tote bag, and a more elegant capture of her hand and sunglasses from yet another take. Since an assistant would be covering up part of her left shoulder, he first captured her shoulder while the model stood upright, then patched this in, too.
When Laurent got back to his studio, he had to convert the RAW files from his Canon EOS 5D Mark II. The primary task here? To match the color of all the images as much as possible. Only then could he bring them into Adobe Photoshop, layer them together, and begin the compositing process.
The empty background shot provided the base layer—its iconic New York taxis make for a more compelling scene than what was in the best photo of the model.
The next step was to cut out the figure. Laurent used Photoshop’s high-precision Pen tool to separate her as smoothly as possible, then layered her on top of the backdrop.
Next, using a combination of the Pen tool and masks, he disentangled the shadow of the assistant from the shadow of the model. Because he had the background image to work with and everything lined up, he could keep cloning and healing to a minimum—he mostly used masks to show or hide the areas he needed. His final layered file contains many masked Curves Adjustment Layers that tweak areas of the image to get the right balance of brightness and contrast.
Laurent calls his aesthetic “real-world illustration.” It is just far enough from reality to give the viewer a jolt of the impossible. For him, retouching software is a tool to realize the amazing, crazy pictures he sees in his imagination.
This photographer’s post-production setup includes a Mac Pro tower with a 2.26 GHz Quad-Core Intel Xeon processor, 16GB RAM, and four 1TB hard drives. He views his images on an Eizo 21-inch CG21 display and keeps his Photoshop panels on a second, moderately priced monitor. Laurent also considers his Wacom Intuos 3 tablet essential to retouching.
About the photographer:
Born in the French countryside, Laurent moved to Paris 10 years ago to become an industrial designer, but, as he puts it, “the dream wasn’t as interesting and creative as I thought.” Frustrated with the lag time between design and product, he turned to photography for its immediacy. He was drawn to heavy-duty postproduction because it allowed him to make images that looked pricier than his budget allowed. His clients include Coca-Cola, Epson, and Microsoft. See more at www.romain-laurent.com.
Page 2: Raïssa Venables
Page 3: Mat Baker